WhatsApp AI Pro Setup: A Step-by-Step Walkthrough (2026)
Install, link your WhatsApp, teach the AI about your business, and ship your first AI-drafted reply — in about 15 minutes, screenshot by screenshot.
What you'll have when you're done
About 15 minutes from now you'll have:
- WhatsApp AI Pro installed and linked to your phone's WhatsApp.
- The AI knows your products, prices, and policies.
- A live AI agent drafting replies for every incoming message — in the customer's language.
- A pipeline view of every conversation, sorted by stage (New inquiry → Quoted → Negotiating → Closing).
The app guides you through this with a Quick Setup checklist in the sidebar — 5 ticks, in order. This tutorial follows the same order, screenshot by screenshot, so you can keep this page open next to the app and just match the picture.
If you'd rather watch:
Step 1 — Install the app
Grab the installer from the Download page.
- macOS: Intel or Apple Silicon (M1/M2/M3/M4). Needs macOS 12 Monterey or later.
- Windows: Windows 10 or later, 64-bit.
First launch shows a welcome modal with three options: Add company info to get started, Try a live demo first, and I'll explore first. The demo is worth 60 seconds if you're curious — you play the customer and watch the AI answer. To follow this tutorial in order, click I'll explore first; the Quick Setup checklist on the left sidebar is what you'll work through next.

macOS security warning? Right-click the app icon → Open → confirm. Standard Gatekeeper thing. Full troubleshooting in our installation permissions guide.
✓ You're done with Step 1 when the welcome modal is closed and you see the empty main window with Quick Setup 0/5 in the left sidebar.
Step 2 — Connect your WhatsApp (Checklist item 1)
In the left sidebar, click New Session. A QR code appears in the main panel.
On your phone:
- Open WhatsApp.
- Settings → Linked Devices → Link a Device.
- Scan the QR code on your computer screen.
The session connects in 5–10 seconds and the main window starts loading your chats.

Important gotcha. If you already have WhatsApp Web open in a browser, close it first. WhatsApp allows multiple linked devices, but having Web and AI Pro open together causes messages to show up in one place and not the other. Reopen the browser tab later if you need it.
You can repeat this step for multiple WhatsApp numbers — each one becomes a separate session in the sidebar.
✓ You're done with Step 2 when your chats appear in the middle column and the checklist item "Connect WhatsApp" has a green tick.
Step 3 — Tell the AI about your business (Checklist item 2)
This is the step that decides whether the AI is actually useful or just makes things up. Don't skip it.
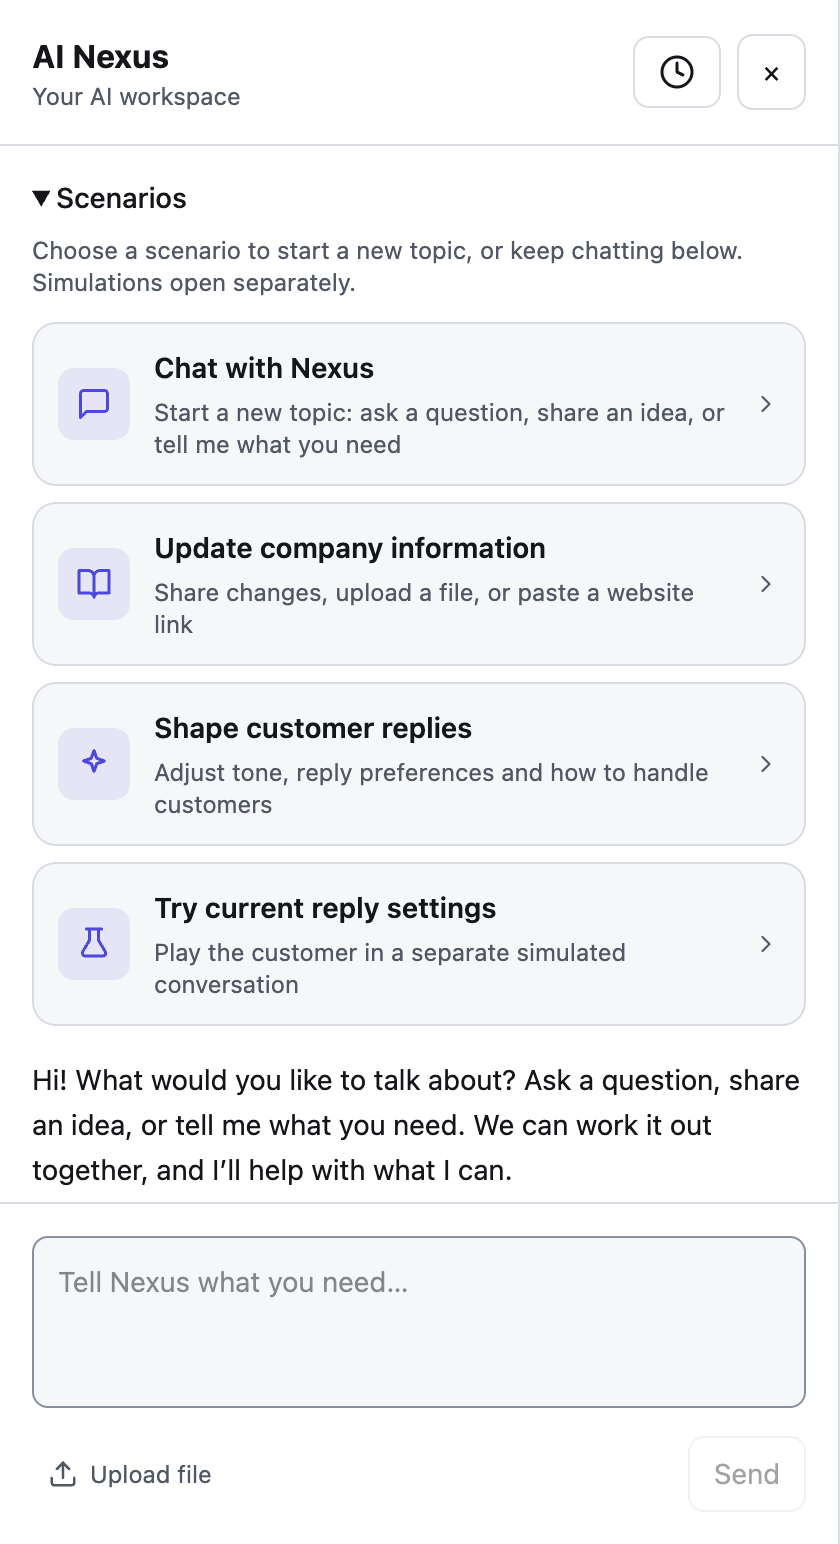
In the sidebar, click AI Nexus at the bottom — this is the command center where you train and manage your AI agents. First-time visitors land on a setup chat: answer a few quick questions (company name, products, strengths, markets) and your business profile builds itself as you type:

Prefer not to type? The same screen takes shortcuts:
- Upload a file — PDF, Word, Excel, or plain text. Catalogs, price lists, brochures all work.
- Pick a folder — point AI Pro at a folder on your Mac/PC and it ingests everything inside.
- Paste a website — your product page, About page, or storefront URL.
Once your company name and at least one real product are captured, click Save profile.
The system reads the source, extracts products / prices / policies / trade terms, and saves a structured profile. After it finishes, switch to the Business Intelligence tab to review what got extracted and fix anything wrong:

Watch the AI Readiness indicator on the right. It scores 0–4 sections completed. Below 4 means the agent will hedge on questions it can't answer; at 4 it speaks with grounded confidence. If you're missing Proof links (case studies, press), it'll prompt you to add them.
✓ You're done with Step 3 when AI Readiness is at least 3/4 and the Catalog table shows your real product names and prices — not placeholder rows.
What to feed it first (and the multilingual trick)
Priority order, because it covers the vast majority of buyer questions: product catalog with specs and model numbers → price list including volume tiers → MOQ per product line → shipping terms and delivery times by region → payment terms and sample policy. Then add competitor notes, common objections, and certifications as you go. A practical trick: for one week, write down every question your sales team gets asked — the most frequent ones go in first.
One thing people don't expect: you don't need to translate anything. Upload your catalog in English, and when a buyer writes in Portuguese, the AI reads the English knowledge base and replies in fluent Portuguese with the correct specs and pricing. One set of documents powers every language your buyers speak.
And the payoff curve is predictable: week one the AI confidently handles ~60% of inquiries; review the questions it flags each week and fill the gaps, and it's ~85% by week four, ~95% by week eight. The businesses stuck at 60% are the ones who set it up once and never touch it again.
Step 4 — Create your first AI Colleague (Checklist item 3)
Still inside AI Nexus, open the Takeover Settings tab — this is where your AI colleagues live. The app ships with two starter colleagues already set up, so you can skip this step entirely and use one of them. To add your own, click the New Agent row at the bottom of the agent list. You'll get a preset picker:

- Sales Agent — handles inbound inquiries, quoting, follow-up. Most people start here.
- Support Agent — handles post-sale questions, returns, troubleshooting.
- Custom Agent — write your own persona from scratch.
Pick one, name it (the default is fine), click Create Agent.
If the "Missing company information" warning appears, you skipped Step 3 — finish Business Intelligence first, otherwise the agent will refuse to quote prices.
✓ You're done with Step 4 when the agent card appears in the Takeover Settings list with its role shown under its name.
Step 5 — Refine the agent by chatting with it
This is the part most other tools don't have. Instead of editing prompts in a config file, you train your agent by talking to it.
On the agent card, click Chat → a side panel opens with two tabs. Make sure Refine is selected:

Type instructions in plain English (or any language). Examples that work well:
- "Always greet the customer by name if it's available."
- "Never promise delivery dates without checking the order system first."
- "If the customer asks for a discount under 5%, approve it. Above 5%, draft only — don't send."
- "Keep replies under 3 sentences unless they ask for details."
Each instruction you confirm gets added as a training note. The agent uses these alongside your Business Intelligence on every reply.
✓ You're done with Step 5 when you've given the agent 2–3 instructions and clicked Finish (Save) — that's what turns the conversation into saved training notes.
Step 6 — Test it as a customer before going live
In the same side panel, switch to the Test tab:

Pretend to be a customer. Type things like:
- "What's the price for 500 units of [your product]?"
- "Do you ship to Brazil?"
- "Can you do a sample order?"
- The trickier ones your real customers actually ask.
The agent replies using its full production prompt — what you see here is exactly what your customer would see. If a reply is wrong, switch back to Refine and tell it what to do differently. Iterate until the answers feel right.
✓ You're done with Step 6 when the agent answers your hardest test questions correctly and in your brand's voice.
Step 7 — Pick the AI mode (Checklist items 4 + 5)
At the top of the Takeover Settings tab sits the global AI Mode switch — one setting that applies to all your AI colleagues at once:

Leave the staffing switch on Solo mode for now (Team mode routes every draft to human reps on Telegram — a separate workflow covered in our team inbox guide). Under Solo you get three modes:
- Suggest — AI writes every reply as a draft. You approve, edit, or reject before anything sends. Start here for the first week. No matter how good your testing went, watching real drafts on real customers is how you spot the last 10% of rough edges.
- Auto — AI sends replies on its own, without review. Switching this on pops a confirmation dialog and keeps a visible AUTO MODE banner on screen the whole time it's live — you'll never wonder whether the AI is sending by itself. Best once you trust the agent on routine questions.
- Watch — AI reads conversations and builds CRM profiles but doesn't draft anything. Use this if you only want the customer-intel features.
Two settings next to the mode switch are worth knowing about: Catch-up on startup queues drafts for messages that arrived while the app was closed (last 24h, drafts only — never auto-sent), and Limit takeover to a schedule lets the AI take over only after hours or on weekends.
Then pick which colleague handles new conversations: on its agent card, click Set as Default.
✓ You're done with Step 7 when AI Mode is set to Suggest and the checklist item "Pick a default agent" has a green tick.
Step 8 — Translation and voice notes: already on, nothing to configure
There used to be a per-session settings panel for this. There isn't anymore, because the answer was always "yes, turn it on":
- Auto-translate is always on. Every incoming message is translated into your interface language — look for the Translate → [your language] badge in the session header. Your replies go out in the customer's language.
- Voice transcription is always on. Voice notes become searchable text the AI can read and act on.

The translation target follows the app's Interface Language setting (English, 中文, Español, Português — or "Follow System"). Change the interface language and translations follow.
✓ You're done with Step 8 when you've spotted the Translate → badge in the session header. That's it — this step is a drive-by.
Step 9 — Watch the first AI reply happen (Checklist item 5)
Wait for a real customer message — or, faster, ask a colleague to message your business number.
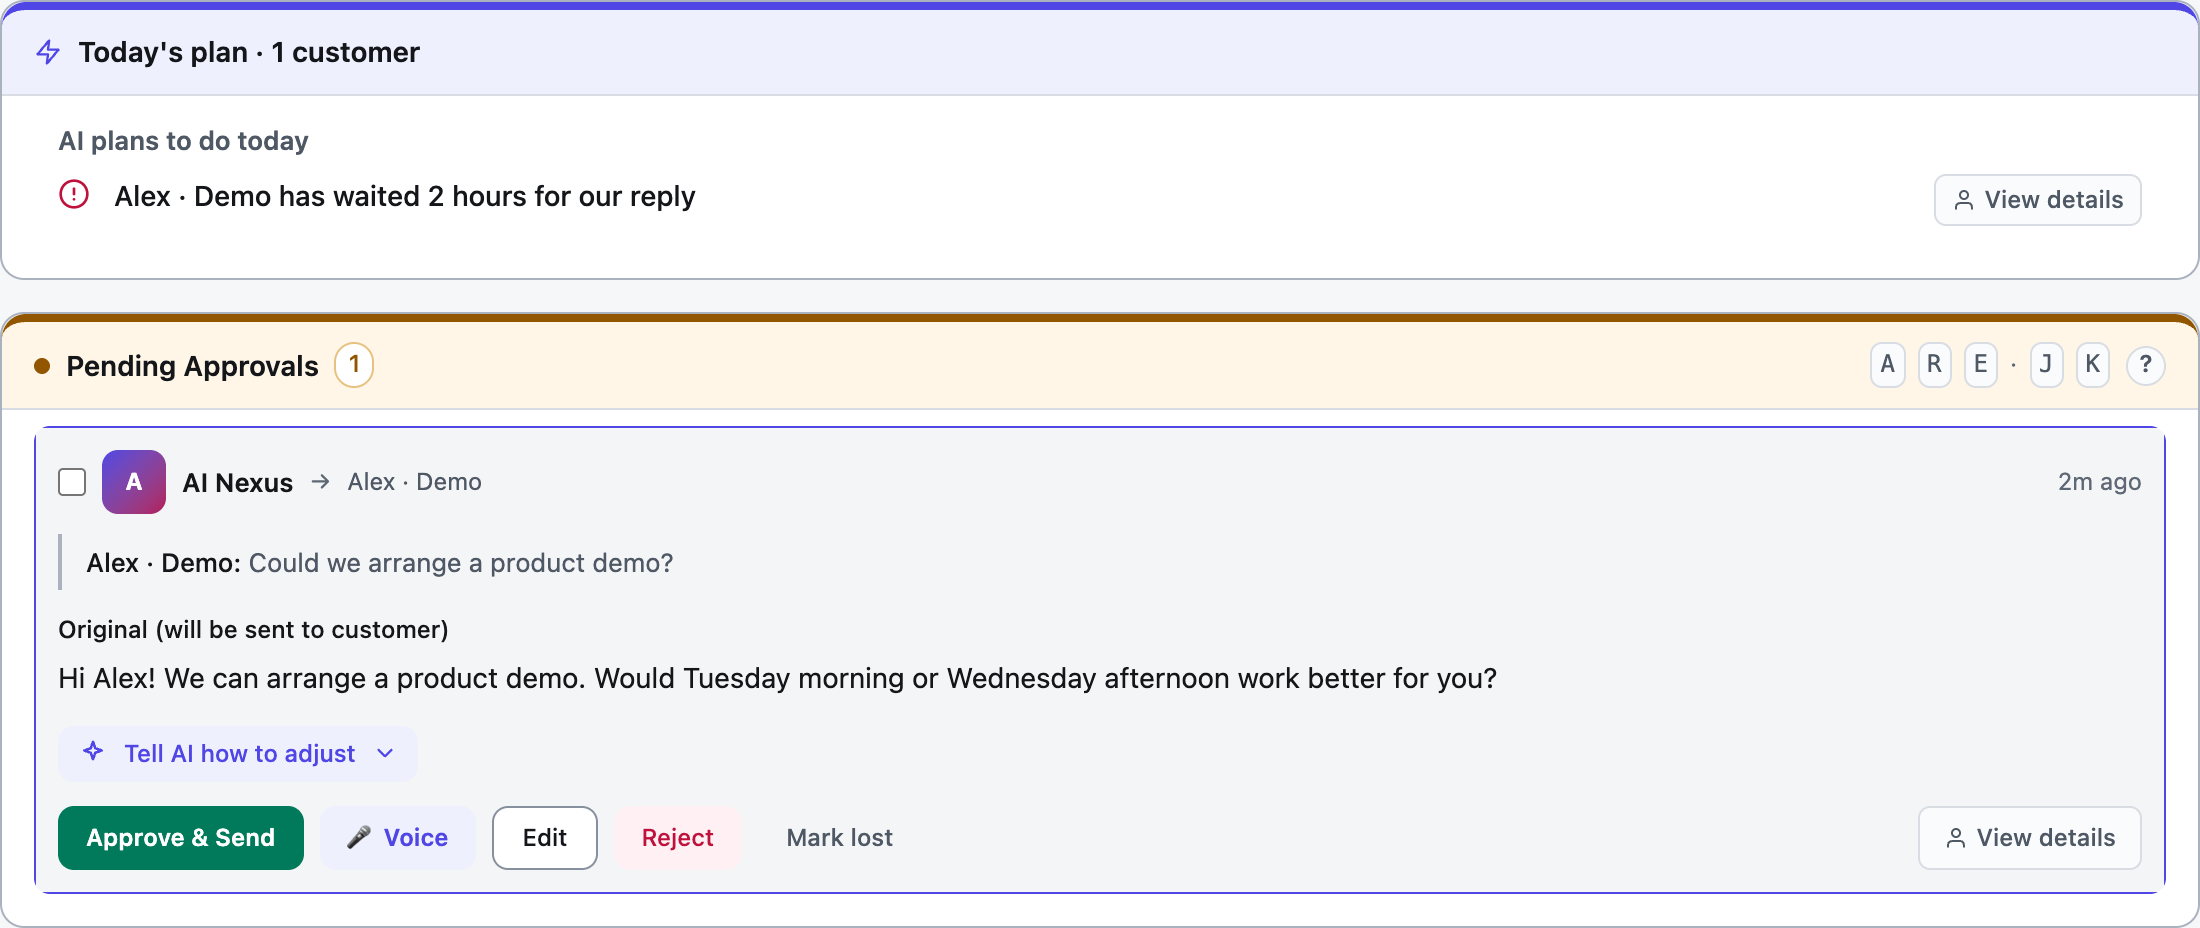
In Suggest mode, the draft appears at the bottom of the chat with Approve / Edit / Reject buttons. Approve → it sends. That's the moment the last checklist item turns green and Quick Setup hits 5/5 complete.
To see everything across all agents in one view, open AI Nexus → Dashboard. Conversations are sorted into pipeline columns automatically:

Each card shows the contact, the last AI action, and quick buttons (Go to Chat, Snooze, Won, Lost, Dismiss).
For an audit trail of what the AI has been doing, open any agent's Activity log:

Every draft is logged — Approved, Rejected, Routed (escalated), Retry. You can scroll back and see exactly why the AI made each call.
✓ You're done with Step 9 when at least one real reply has gone out and you can see it in the Activity log.
Step 10 — Approve replies from your phone (optional)
If you're often away from the desktop, set up Telegram approvals so you can tap Approve / Reject from your phone:

In AI Nexus → Takeover Settings, expand the Telegram setup section, then:
- Open Telegram, search @BotFather, send
/newbot, and copy the bot token it gives you. - Paste the token into the Telegram Bot Token field and toggle Enable Remote Notifications.
- Send
/startto your new bot in Telegram. - Back in the app, click Bind Telegram. Use Test Connection to confirm — you should get a test message on your phone.
Every pending draft from now on lands in Telegram as an approval card:

Full walkthrough: Telegram remote control guide.
Things that trip people up
"The AI keeps inventing prices / specs." Your Business Intelligence has gaps. Open AI Nexus → Business Intelligence, click Re-analyze, and make sure the Catalog and Identity sections are filled in. The AI only stops guessing when it has something to ground in.
"Replies feel too formal / too casual." Open the agent's Chat panel (Takeover Settings → agent card → Chat), switch to Refine, and tell it directly: "Use a more conversational tone, like texting a friend." It'll update training notes immediately.
"I want auto for FAQs but manual review for quotes." Set AI Mode to Auto, then in the agent's Refine chat add: "If the customer asks about pricing or custom orders, save as draft and notify me — don't send automatically." The agent will route quote-related messages for approval and auto-send everything else.
"I prefer dark mode for long shifts." Toggle Theme at the bottom of the sidebar:

What two weeks in Suggest mode actually looks like
If you're wondering how long "the first week on Suggest" really takes to pay off, here's the typical trajectory:
- Days 1–2. You read every draft carefully and edit maybe 30% — tone tweaks, phrasing you'd never use. You notice knowledge gaps and add the missing info.
- Days 3–5. Edits drop to ~15%, mostly small things. You're approving most drafts untouched.
- Week 2. You're approving 95%+ without changes. The AI has your tone and your product knowledge. Time to flip routine categories to Auto, keeping Suggest for high-value conversations and VIPs.
Two details worth knowing. First, even at 100% human review, Suggest mode is fast: reviewing and approving a draft takes 10–15 seconds versus the 3–5 minutes of looking things up and typing a reply yourself — a 10–20x speedup before you automate anything. Second, when you jump into a conversation manually, the AI automatically pauses for that customer and resumes after a cooldown — no awkward double-replies, no manual toggling.
The honest playbook
- Run Suggest mode for the first week. Approve, edit, reject. Every edit you make is a free training signal — note the patterns.
- Each time you reject a draft for the same reason twice, add a Refine instruction so it doesn't happen a third time.
- Once you're approving 90%+ of drafts without edits on a category of question (price quotes, shipping, return policy…), it's safe to switch that agent to Auto.
- Keep one agent on Suggest for the messages you never want auto-sent (custom quotes, complaints, anything VIP).
That's the whole thing. Download here if you haven't yet, and ping us on WhatsApp if you get stuck mid-setup.
The complete guide: WhatsApp AI Auto-Reply: everything in one place →